Disclaimer: This post is HUGE. I take no responsibility for your mental state if you read the entire thing.
It's been forever since I've written anything here, I know. If you only check this blog for some new glitch discovery or something, you'll be disappointed with this post. You see, this post is just going to be a giant mess of text about stuff I've played. Oh boy!
Let's start with something old: Clock Tower. I had written (a long time ago) a fairly lengthy account of my first playthrough of the original game, but I ended up scrapping it. So instead of trying to remember the stuff I wrote and how overly dramatic it was, I'll just sum it up in three sentences:
1. Clock Tower 1 is the bee's knees.
2. Clock Tower 3 (as in, Playstation 2) is complete garbage that spits on almost everything that 1 did well.
3. The Playstation port of 1 is ok, but suffers from some terrible slowdown and inferior music.
Now onto the next game that I wanted to talk about ages back! This would be Front Mission 4. I could go into some overly lengthy explanation about how awesome the game is, but "a more complicated Fire Emblem with robots" sums it up pretty well if you ask me. Seriously, the battle system is good (though the RNG is another story).
Two games down and uh...two left to go! Unfortunately for you, the next two won't be as short and painless as the previous two were. The first is Tear Ring Saga and the next is Berwick Saga. See a pattern? If not, you'll learn something new if you keep reading (or if you leave and check Wikipedia; whichever comes first)!
Tear Ring Saga, simply put, is the best darn Fire Emblem clone ever. It's pretty easy to see why, because the game is SO close to being one. So close, in fact, that I bet you could update the visuals and release it outside of Japan as "Fire Emblem: (Subtitle here)". People would eat that stuff up, and after the initial "the system took a step back!" complaints, they would consider it Fire Emblem 12. For serious.
Anyway, the game is really good and you should play it now (if you haven't already). I've completed the thing four times now (three on console), so I think it's safe to say that there is a good amount of replay value in it. It's also only like $25 before shipping, though you'll obviously need some method of playing Japanese games.
By now you are surely wondering where I'm going with this, and why I just won't get to the point already. If not, ask me so I can say: "Patience, young grasshopper. I'm getting to the point right now. Starting now. No, really, I'm going to start talking about something relevant right now. Don't rush me! I know what I'm doing and I'll get to the point when I'm good and ready!" Uh, where was I?
Oh yes, mock run discussion. I started one a few days ago, and it was a complete disaster. I pretty much applied my awful Megami mock run technique to this game, which explains why it went so poorly. For those who don't know what I mean by that, it simply means that I was winging the whole thing. I had the general idea in my head, but the details would be decided on the spot. Because of this, my final time was 9:28.07. I'm basing that off the clock that displays post-turn count, which means that my actual time was probably 9:15 or so. Still awful, of course.
If you're familiar with the game, you probably already guessed that I abused Zeek whenever possible. Other obvious things are using Narron (promoting at level 10) and Lionel. There is only so much you can do in a game with map animations ("real" for bosses) and completely absurd amounts of reinforcements though. Seriously, those enemy phases take FOREVER (see Map 16 if you don't believe me).
I'm just going to resort to listing the general idea for each map, because I can't string this together very well. This is all going to be a mix of what I did, what you probably should do, and what you should NOT do. Hopefully that makes sense.
Map 1: Kill stuff (no, really?). Beef the cursed Iron Sword. Giving Runan experience really doesn't matter. Sea Fighter is stupid, so skip it.
Map 2: Barts can actually kill everything near the castle (including the boss) without much effort, though he'll need to rely on Enteh support and healing. The rest is mop up for Raffin/Narron/Runan. I took the time to pick up the extra items and Plum (she's an obvious must-have).
Buy a Hammer before moving on to Map 3. Also pick up two Bridge Keys whenever possible with Runan's team (I don't remember which shop sells them). The keys are EXTREMELY important later, while the Hammer is only really useful in Map 6.
Map 3: Go go horse-killing weapons. VISIT NARCUS (I missed this in my first console playthrough, and it screwed me out of 3 freaking people).
Map 4: Forests suck. Don't bother with Raquel, because she's worthless. Don't kill Roger and Mel, because you'll probably want Mel's Magic Staff later on.
Map 5: Hello there, Zeek. Hope that the NPCs kill a lot of stuff for you and that the boss moves to attack you. Luckily for me, both of those things happened without trying for it. I think that's the first time I've ever seen the boss move down to attack my dudes when they had just come out of the narrow hallways. Ugly AND suicidal, it seems.
Map 6: The best goal type of all is "defeat boss," so this one is stupidly easy. Give Zeek the mighty Hammer of justice to make the boss go ARGH and die. Kill off the dudes on the right to stop their constant time wasting attacks, since that is probably better than letting whoever is over there die.
Map 7: Easy map. Follow Zeek to victory and leave Mel near where Roger appears. Wait a billion turns for him to show up, and then recruit him. Using him is up to you (I gave him some use), because he's really not that useful outside of getting the Magic Staff.
Map 8: Bring only Runan, Enteh, Zeek, and Raffin. Let Enteh hide near the bottom middle while Runan heads for the gate. Zeek is there to plow through any Zombies in Runan's path, though he'll probably have to do so one at a time because they know fighting him is hopeless. Let Raffin hang out at the bottom right to pick off some Glaice Mummies.
Pick up what chests you want while doing all that, but I don't think there is much of use here. Certainly not that freaking Thunder Shield in the swamp.
Team swap: Narron/Roger/Mel/Maruju -> Holmes. Narron is the mini-Zeek for Team Holmes (haw haw, I like that), Roger/Mel for the Magic Staff, and Maruju for Slypheed.
Map 9: Follow Zeek (at a very safe distance) to victory again. Let Raffin eat a poor sap or two, if you want. For best results, have Zeek wait next to the gate before the real boss appears. He'll appear and commit suicide on the same turn, like the moron he is. "Aha! Ambu-ARGH!"
Map 10: Sadly, Zeek has to hold back here. You need to recruit Sharon and Billford (use Raffin, obviously), because Dragon Knight Raffin is pretty useful. He's not Zeek or Narron, but go go dismounted lance use.
It's up to you whether to recruit Mintz or not. I did, but he served very little purpose (other than accidentally recruiting Rennie, who is useless for this run). I'd recommend skipping him entirely unless you really want a second Needle Spear for free.
Make sure to send Plum to the house near Sharon and Billford before finishing things up.
Map 11: Skipped entirely. Feel like a heartless you-know-what when you think about how you left Samson and Alicia with an army of angry bandits. Ho ho ho, that'll teach Samson not to have flaky growths.
Map 12: No more Runan for a while! YES. No more Zeek for a while! NO! No matter, you have Narron and Lionel to save the day! Sentence ending with an exclamation point! Or two!! Maybe even THREE!!! Ok, I'm done now.
Seriously though, save Attrom. His only purpose in life is to recruit Renee, and that is a very good thing. Let Narron clog the gate before the boss appears, so that he'll show up right below that spot. Easy boss (who is cool looking, by the way) is now even easier to kill. Yay?
Also make sure to yell at Holmes for being one movement short of a two turn completion (no matter what you do). Also be sure to buy a million of those 1,500 G lances. Most useful weapon in the game, by far.
Map 13: Save Krisheenu at all costs. If you get lucky like I did, Maerhen will move into your range for a two turn completion. Yay short map.
Map 14: Re-recruit Plum and win. This is completely self-explanatory.
Map 15: I killed off Sun and Frau here, but you might want to consider sparing Frau. I say this because I wonder if using her as a hole plug in that Ernest map will do any good. I doubt it though, so don't feel bad if you took her to school.
Recruit Lyria.
Map 16: If you haven't started to hate running this game yet, this is where you will break. The only strategy I can recommend is "give up now." Seriously, this thing will take your (possibly) awesome time and throw it in the trash.
On the other hand, there is someone that has completed the thing in like 7 turns, so read her strategy and try to mimic it as best you can. She was doing a low turn run though, so lots of Zombie abuse is practically a given (therefore it might not all be applicable to a run). Still, you don't argue with a plan from someone who completed the game in 126 turns.
Map 17: Go go Bridge Key #1! The boss kill goes to Zeek or Raffin, take your pick. I forgot to buy Bridge Keys, so this map was extra slow for me.
Map 18: Another good spot to quit, if you haven't done so yet. It turns out that almost everybody goes poof when the boss dies (a fact I didn't learn until after I smoked him), so get Zeek in there and do that as soon as possible. If you feel saucy, test Runan's dodging skills to lower the turn count. I wouldn't recommend it though.
I tried training Meriah on those Zombie spawns while doing all this stuff, but that's likely a waste of time. I wanted a level 10 promotion (extra power for double Aura Rain), but she never got there.
Map 19: Walk in and win. Seriously. You can even ignore Loffaru, because he joins anyway. I'm not sure you need to, but take Zeek's stuff before you finish the map.
Map 20: Part one is just a group of monsters, so that's a no-brainer. Part two is for Lionel to gain experience and promote in. Parts three and four only require you to open the chests, so restart until you get the closest ones. Part five (where Map 20 actually begins) is a little more difficult, but even a barely trained Holmes can make it to the gate without much effort. Yawn.
Map 21: I had Lyria use the Power Staff on Lionel and Shigen, which was definitely helpful. Lionel moves to the top reinforcement area and Shigen gets the right side (Dullahan is useful here, so abuse it). If necessary, have Lionel help Shigen out (preferably once the top side is done).
Holmes opens chests, obviously. Use Katri in dragon form to distract that big ugly dragon and/or roast a dude or two. Not much else to it.
Map 22: I hope your Lionel has been gaining movement++. If not, this map will go from being stupidly easy to just plain stupid. Zachariah moves first (on the first turn, at least), so if you can get there with an Armor Killer or something, a winner is you. If you can't, you need to hope Lionel has half a brain.
For the record, mine did not. He wasted some good chances for Life or Death criticals, and I was very displeased.
Map 23: Do not make the same mistake I did by not recruiting Rishel. Let me make that absolutely clear: RECRUIT RISHEL. It didn't hit me until afterwards that you need him to get the Aura Rain, and then I was a sad (and angry) panda.
Do what you like here, but I'd recommend Lionel for the middle (mass pegasi slaughter), Narron for the top left, and Zachariah for the bottom right. Then get Bud all the freaking way over there to recruit Rishel. It will take a while, but it will pay off so much.
Sealed Bridge: Kill off Shigen. Self-explanatory otherwise.
Team swap two: Put someone who can open chests on Runan's team (your funeral if you pick Maerhen though). Please remember that Krisheenu can't do that, because you'll need her for Team Holmes.
Edit: Krisheenu can't open chests and doors without keys. I are stupid.
Lionel/Plum/Rishel/Mel/Maruju -> Runan and Narron/Mahter -> Holmes.
Double edit: Maruju for Runan and Mahter for Holmes? I don't even know what the heck I was thinking when I wrote that.
Map 24: Use the Magic Staff on Meriah and wait for turn 5. Unleash Aura Rain (make full use of supports for extra giggles) once, dance, unleash Aura Rain again. If anything lived through that, point and laugh because they probably have 1 HP.
Your next goal is to get Runan to the gate as soon as possible, because those Horseman reinforcements are pesky flies that waste time. For best results, plug the two holes with Raffin and Mahter (or Frau, if you have her and don't like the hawtness that is Mahter).
Map 25: If your Lionel is at least decent by now (which is pretty likely), this map will be easy. Move Runan straight down and move Lionel with him. Lionel's job is to go pick a fight with the Dragon Knights and prove how manly he is by killing them all in one or two hits each. He'll do it too, as long as you don't do something stupid like allowing them to maximize their support bonuses.
Have Runan enter the Frontier Fighter house and gain that skill. It will slightly speed up his journey through the desert. If you haven't guessed by now, the goal is to seize the bottom castle. Yes, I know that Map 26B sucks.
Map 26B: Obtain that MOV Plus at all costs. If you have to (I did, because I didn't bring a Thief), grab the Thief Sword from that one Swordfighter and wait for the enemy to open the chest. You'll likely want to save before hitting the dude, if you use that method.
Other than that, have Vega kill the boss. That sword is going to be useful pretty soon.
Map 27: Nothing to explain here. The only real problem is that the enemies aren't that suicidal. Bismark (who looks like Gregory Peck, don't you think?) is still a moron though.
Map 28: Sierra kills the boss with a God Hand critical. I can't remember if the Magic Staff is necessary or not.
Map 29: Bring Attrom and Krisheenu. The idea is to recruit Renee as soon as possible, so you might want to put the Main Gauche on Attrom to help keep him alive. Krisheenu, on the other hand, is to be killed off. It doesn't matter how you do it, as long as she dies.
Once you get Renee, lure the boss out, Warp, and win. Oops, he left the gate open. Go go ninja Holmes?
Map 30: Warp and win. Ignore the skills. If you can't resist learning something though, complete the map and come back. If you get anything, make it Gale (on someone capable of using Rikuud).
Morse Tower: Warp through the first two floors, repair Warp on floor three (move Holmes to the stairs manually), use Warp on the other floors. Revive Krisheenu.
Morse Tower (again): Yes, again. Same procedure here until the fifth floor, but feel free to use Warp on the third floor this time. On the fifth floor, bring Krisheenu and have Shigen speak to her. Have her speak to Holmes after that, to be sure. Go to the next floor, talk to the girl there, and leave.
Oh my goodness! Krisheenu cloned herself! Duplicate whatever you think you'll need, but give priority to stat items (especially MOV Plus), Elixirs, Lunar Swords, and the Rikuud. I actually went and raised my stats in a monster battle at this point (leave one alive and have fun), but that's up to you. Try not to get carried away like I did.
Last team swap: I'm not quite sure, but you might want to try Renee for Runan's team. Warp is good (Map 34 says hi) and her special staff will help on Map 37. On the other hand, the massive swamp in Map 32 will cause Holmes a lot of grief. Do what you think is best, but I'm leaning toward recommending Renee -> Runan.
Sealed Bridge (again): Easy.
Map 31: Warp someone in there and smoke Zeek. If you don't have Renee, use Sierra to do it.
Map 32: Sierra kills the boss, Warp Holmes, and win.
Without Renee, things are much slower. If you beefed up Sierra to the point of being ridiculous, send her to the boss to kill him and countless others. If not, do things the old-fashioned way (freaking swamp).
Map 33: Same as Map 32, regardless of whether you have Renee or not.
Map 34: With Renee, this should be easy. Warp someone strong next to Ernest, dance, Warp Runan, use the Save Staff, hope to win against Ernest (who cheats so much), and seize.
Without Renee, you're on your own. I kept a small pack of units equipped with copies of Lan's Mirror and crawled my way to the gate. Not a very bright idea, but I didn't have Aura Rain either...
Map 35: Fairly easy. Beef your dudes as you walk up to Julius. Lure him out and go to town on him with a Lunar Sword or two.
Map 36: Kill all the enemies and hole plug as best you can. Don't enter the building until Runan has maxed out whatever you want him to (you'll like having super Runan at your disposal, trust me), since this is the best chance to use items in bulk. This goes for any hole pluggers too, if you feel it's necessary. If you have Renee with you though, then I doubt the others will see much use.
The rest of the map is self-explanatory. Hole plug and/or kill what you missed. Wait for the dragon to leave you alone.
Map 37: This map sucks if you don't have Renee. The goal is to kill those pesky summoner dudes first, but Runan can probably go ahead and run through dragon land toward the boss instead. You know the rest (yay Bridge Key #2!).
If you have Renee, I'd send Runan to the boss immediately. Drop him with a Master Sword (should work nicely with maxed strength). Warp others to the summoners when you can, but make sure to use that other staff to kill off hordes of monsters if they build up.
If you're a true masochist, you can kill all three summoners on turn one (saving huge chunks of time). Warp once, dance, use Lyria to give Plum another turn (rare), Warp again, dance, and Warp one more time. Send Runan to the boss on turn two, dance, and then use the monster killing staff (if it works on dragons). Super quick.
Map 38: If you have Renee, Warp Holmes two spaces to the right of the boss and kill him with a Gatling Bow. If you don't have Renee, I can't really help you. It probably isn't hard at all though.
Map 39: Warp and win. Without Renee, walk over there and win. Seriously, it's that easy.
Map 40: Personally, I make it a priority to roast Karla (I used super Yoda). You really don't have much else to do until Gwenchaos gets his fix anyway, so go ahead and do that. Use Sierra to open the bottom and right doors, Warp someone to open the left door, kill stuff, plug holes, and win. If you've gotten this far, there really isn't any problem figuring out how to do things here.
Once Gwenchaos morphs, use Renee's monster killing staff and get in there. The other guy (not Holmes and Runan) will have trouble getting his slow butt into position, so you might want to give Sierra a MOV Plus for him to grab and use on turn one. Surround the boss, kill him once, and it's over.
Now the fun part begins: unskippable dialogue, credits, and post-game stuff. The fun part of all that? The timer is still counting! Haw haw, sucks for you.
Ah, now that I've gotten that out of the way, I can start blabbering about Berwick Saga! Text wall part two! Go now! For great justice! Seriously though, I'll try to keep this part fairly brief. If you've read everything up to this, then you deserve a break (and a medal).
Berwick Saga is supposedly in the "Tear Ring Saga series," but I really haven't seen anything that makes me think it's a sequel yet. Maybe that will change eventually, because I'm only up to Chapter 4 and I still can't read any Japanese other than some katakana. Still, the characters and setting all seem different.
Important disclaimer: I'm not that good with katakana, so my version of character names may differ (perhaps even completely wrong) from the actual name. If you know the real names, go ahead and tell me...so that I don't make myself look stupid anymore. [Edit (7/4/09): Most names changed.]
Speaking of which, the character portraits are kind of weak. For characters like Reese (the main dude) and Adel, the art is overly simple. It's like the artist just slapped some random lines on a page and said "Ah, that looks like a guy. Next!" By the way, Adel is basically the Abel of the game. Original naming scheme -1! To be fair, the Kain guy is named Leon (looks like Lion, but I prefer Leon). So at least his name isn't Kano or something...
On a different note, I can tell that music is not this game's strong point. While it isn't exactly terrible, it just doesn't stack up to Tear Ring in that regard. Then again, Tear Ring music is pretty darn hard to compete with. Making matters worse though is the fact that battles take me forever to complete. When you spend an hour or two listening to the same track repeat, it doesn't exactly improve your opinion of it. I should just be thankful this isn't Monshou Book 1 though, eh?
Gameplay-wise, the game is pretty hard to pick up. It's way more complicated than a Fire Emblem game is (not hard to achieve that), but some new things are appreciated. For example, someone with a Thief or Pirate class will become invisible when entering a house/forest tile. It works just like Advance Wars did with fog maps, except that this ability is always available. Very cool, even if it does cause a little headache when enemies use it.
Other nice additions are ambushes (I've only seen enemies use it though), mounts that can die, and CAPTURING. Yes, capturing is back. I haven't pinned down exactly how it works yet though (I'm trying to do the first playthrough without any help). Basically all you do is get an enemy into bad enough shape that a red + appears on them. Once you do that, just move any unit over there and select the Capture command. The enemy gets sucked in (no stat reduction!) and you get all their items. In addition to that, you get to release them after the battle and you GET PAID FOR IT. Heck yes.
Since I'm having trouble thinking of a good way to link some other observations/notes about my playthrough in a coherent way, I'm resorting to another list. Yeah, I know.
- The game uses a hexagonal grid instead of a square one. Kind of annoying, but you get used to it.
- The game also isn't strictly turn-based. It plays sort of like Langrisser IV and V (just search YouTube, since I won't bother explaining), but without the speed determining movement order part. I don't care for this change, obviously.
- Shirok, who is a freaking Horseman, can't hit a target to save his life. The guy consistently has 6x% hit rates or lower.
- Ward is definitely this game's Jeigan. Not only does he begin the game at level 22, but he also has the class of...Old Knight. Jeigan should have had that class instead.
- Ward comes with the Guard skill, which actually works in this game! Seriously, the Megami people should have paid attention. It's a command skill, so you just pick which adjacent unit you want to protect. Ward will replace the protected character in any battle that he/she gets into. This works 100% of the time and the effect doesn't end unless one of them moves or attacks.
- The Provoke skill is also much better in this game than in Souen/Megami. It's a command skill that you use to make one specific enemy move to/attack the user for at least one turn (I think it goes on for like 3+). The only downsides are that you can't move on the turn you use it, and that it has a random chance of slightly increasing the enemy's attack power. Still, you can easily use it to lure out an enemy or save someone's life.
- Speaking of saving someone, perma-death exists in this game as well. Not a surprise.
- You can hire mercenaries, but they only help for one battle at a time. Once I realized this, I stopped hiring them entirely...with one exception. There was a map where I used the Pirate guy to cross the river and lower a drawbridge. That was pretty cool, because it only cost me 350 D to hire him.
- I can't tell whether Olwen (I'm not kidding) is male or female. I'm leaning towards female, but she could be some sort of trap.
- On a similar note, the guy who collects "dark" weapons reminds me of Leeron from Gurren Lagann (toned down, of course). It's probably just me though.
- I don't know what connection she has to Shirok, but I was hoping that Ophelia would join my team. She was hawt.
- The chick behind the left counter in the item creation shop is hawt too, by the way.
- The chick near her, on the other hand, is most definitely not hawt. In fact, she could probably peel paint off walls with pure ugly. I'll cut her a break though, because she's old. On the bright side, she's not as bad as Niime...
- Have I mentioned the fact that I wish you could recruit whoever you want in any RPG? If not, I just did. Make sense, I do not. Item creation shop lady + arrow selling girl + Ophelia + maybe that girl that hangs out with the Leeron guy = team of hawtness. Enemies would be powerless against the wave of attacking sexy.
(Marsha, why can't you join my human team? WHY?!)
Uh, anyway, I think I'm done now. There's still a ton of junk floating around in my head right now, but there's only so much I should go on about (at least at one time). This is where audio would cover so much more, but I don't think I'd ever subject someone to that. Then again, I did record myself singing the Gilligan's Island theme song a while ago (for use in a commentary)...even though I scrapped the idea later. That's pretty sick.
Thursday, June 4, 2009
Tuesday, February 3, 2009
15.08 is the new 15.43.
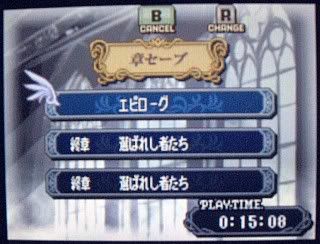 I completed another run of Shin Ankoku a few days ago, and my personal best is now 15.08. A lot of this came from simple optimization, believe it or not. I branched a save at Chapter 12 to test (for the second time) my Boa plan, so I was left with only two slots to work with for the rest of the game. Because of this, I couldn't optimize it as much as possible...although I tried my best. Keyword there is my best, because I know for a fact that I'm just not as good as some other players out there.
Anyway, I learned some things from a previous Boa attempt (which ended up at 15.58 or so) and tried to keep item management to a minimum. I used a new Chapter 20 plan that saves one turn, but most things were done as before (minus equipment variation). I also used the "press A on the target unit" feature a lot, which definitely helps.
Speaking of that, I noticed that the programmers forgot to fix a glitch with that feature. If you warp someone away by doing that, the game still thinks the person is in that spot (for one turn). Hello invisible Light Rune/convoy/trade partner. Makes me wonder if the supports work too, because it would be rather amusing to have someone receiving support from a unit on the opposite end of the map. Also worth noting that you can select the warped unit (ha, word choice) from the tile they were at, but you can't really do anything because it's still out of range.
[Random thought that just hit me while I wrote that last sentence]: What happens if you warp the unit only a few spaces away, and move them around after selecting the original spot? Do I smell Tibarn the Astronaut cooking again? Probably not, but I'll test that later.
[Edit]: I've tested this "glitch" some more, and there is no Tibarn to be found (sadly). I'll note some observations I made though:
- It does not function as an invisible Light Rune during the enemy phase. It only appears to limit enemy movement during the player phase, but they just run right through it.
- You can use the Talk command normally. I sent Sheeda to the top right of Chapter 15 and had Oguma talk to the square where she was, and they spoke to each other as if everything was normal.
- I had Marth trade items with himself (no neat side effects though). Yes, you read that right.
- Terrain bonus does not carry over to the new location.
- If you warp a unit a short distance away and select their invisible version, the cursor arrow automatically draws to that spot (you can't move there). Nothing else neat to note about that.
[End of edit]
For those of you who just want to get to the meat (so you can take me to school, if you haven't done so already), the new Chapter 20 plan is this:
Turn 1:
- Give the one use Warp staff to Rena. Let Boa keep the other one.
- Switch Boa to one space below Marth.
- Switch Rena to the bottom left spot.
- Boa sends Marth to the village.
- Rena moves down and to the left.
- Get the Hammerne staff.
Turn 2:
- Marth moves right. Do not use a Vulnerary.
- Rena trades Warp for Hammerne and repairs Warp.
Turn 3:
- Rena grabs Warp and sends Marth to Lawrence. If she dies during the enemy phase, oh well.
- Recruit Lawrence.
- If Marth's HP is too low, he'll die during the enemy phase (ha, evade). It's just that simple. Prepare for a lot of restarts because of that.
Turn 4:
- Seize gate.
That plan might have been super obvious to some people, but I didn't think of it until that run. I think it works out well, because Rena is useless after that chapter. If she dies (my Rena didn't, which saved time), simply fish out the Warp staff when Boa's current staff hits 2/7. Give one of those to Ellis at the end and win. For the record, if you can't figure out why I say 2/7, I don't think you should be running this game.
I should also point out that I have another run going that ignores Boa entirely. I'm using the save I split at Chapter 12, and my current progress is around Chapter 14. I have one Chapter 14 attempt completed (using only two slots), but I'm not sure if it is a keeper or not. If I get a better time than 15.08, I'll be sure to mention it here.
[Edit]: My time was 15.17 for Rena. This wasn't a good day for optimization, but I still think that proves that Boa is a better choice.
If you have any questions or comments, please feel free to post them here.
[Edit 2]: I have now figured out how to crash the DS/game by using what I'm just going to dub the "duplication glitch" (call it what you want, but that's what it does). Here's how to do it:
Requirements: Two Warp staff users.
1. Warp the target unit anywhere close. Skip the warp animation quickly. If done properly, the unit will have a hidden clone in their original location.
2. Select the second staff user and make them move adjacent to the clone.
3. Select the Warp staff and then press left or right. The game will lock up, requiring you to power off/on to continue. The music won't stop playing, oddly enough.
That's it. With such an easy glitch, you have made the debug department at Intelligent Systems look stupid.
There is also another interesting side effect of this glitch that I want to keep to myself for now. Once I get my hands on some good AA batteries, I'll record all the neat things this glitch can do (I said neat, not awesome). After that, I'll combine them into one video and slap it up on my YouTube account. Please look forward to that.
[Edit 3]: The video link is here: http://www.youtube.com/watch?v=IaBGsOCxIPU
Monday, January 5, 2009
MAGFest is over.
MAGFest has been over for a few days now, so I'm definitely late posting this. I should start off by mentioning that I did not get the Shin Ankoku run that I hoped for. Nate's camera was in working order on the 3rd, but that left with me with a single day to complete the run. That might have been possible (hello all-nighter) under normal circumstances, but this was far from it.
I'll say it quite plainly, because it's the truth: DS recording is absolutely hellish. You have to hold the DS in a specific area in order to get both screens, try not to shake the thing too much, AND actually pull off a good segment. Unfortunately for me, I was either sucking huge donkey nuggets or just simply getting screwed by the in-game timer. Seriously, I did what looked like an acceptable attempt (time-wise) of Prologue-1 that came out in the 43 - 5x range. What the heck happened?
After Nate came back in the room, I just gave up on the idea entirely. I had spent something like 20 minutes or so getting nowhere. It seemed pretty clear to me that I was wasting my time trying to do that run, so I just told him I was giving up. I hated to nag him about the camera and then drop the ball like that, but things were definitely not going my way that day.
Speaking of DS recording, I'm hoping that Trihex will post the videos that he recorded when we were getting the camera set up. In addition to hearing my comments on the whole thing (if that interests you), you can also see the amusing placement of the camera. For those who don't know and don't mind spoilers: It was placed in a coffee cup with things thrown in there to pad it.
Anyway, MAGFest itself was pretty decent overall. I often found myself quite bored, since I wasn't interested in doing any NES challenges and I don't like "shmups." Because of that, I mostly wandered around and just watched people play stuff. That also got old pretty fast, because I didn't care for (or simply haven't played) many of the games in question. Quite obviously, there wasn't a Fire Emblem game for me to watch on a ridiculously huge projector or anything.
Speaking of Fire Emblem though, there was a dude selling a bunch of import games in one of the rooms. Two of these were Ankoku and Gaiden, and he charged way too much for both: $34.99 each. I don't care that they had the box and (most likely) manual, those games are simply not worth $35. $20 for either one in any condition is perfectly acceptable to me though, but unfortunately, Spineshark didn't bring the copy of Ankoku that I was supposed to buy off of him. I even reminded him the day before the event, but oh well.
There were also a ton of other things for sale there, so I picked up a copy of Streets of Rage ($5 and it had the case), S.O.S. ($6 loose), and a plush Mario star ($10). Most of the cash I had after that went to Domino's and I bought a $2 bottle of Bawls near the end of MAGFest. I don't plan to drink more than a sip or two of that bottle, because I don't do energy drinks. Instead, I plan to give it to a friend of mine who is already used to things like Monster.
I should also point out that the copy of S.O.S. is NOT the crappy game known as Sink or Swim. S.O.S. is an awesome game about a sinking cruise ship where you have one hour to escape (alone or with others). Sink or Swim, on the other hand, is a horrible Lemmings (which is a good game, though not my cup of tea) rip-off. Helpful warning to readers: Avoid Sink or Swim like the plague.
Anyway, I'll just do a point-by-point list of the things I remember about MAGFest, since my memory is getting a bit hazy now. I'm leaving at least a few details out, because I'm not some big meanie head:
1. I sat around for HOURS waiting for someone from SDA to show up in the hotel. Seriously, my Dad and I got there at around 8 A.M. and Mike's group didn't see me until around 5 P.M. (I think). Mike says that some of them checked out the area at various times, but I never saw/recognized them. I noticed a guy who looked a lot like Andrew Gardikis fairly early on, but I didn't say anything to him. As it turns out, that was him.
2. Andrew showed off some cool glitches in Super Mario Brothers while we were there. Pretty funny stuff, I have to say.
3. When Nitrodon and I went up to the registration table with Nate, we ended up right beside Walter Day. For those who don't know, Walter Day is a Twin Galaxies guy. As far as I remember, he's actually the big cheese...though I could easily be wrong on that. Anyway, the cameraman was standing on Walter's left and I was on the right. This makes me wonder if they'll upload that footage with me in the background. Haw haw.
4. It's worth noting that Nate was right behind the dude...and didn't know who it was. Maybe I should have told him? That might have been worth a few laughs. Either way, I told him later and his reaction was a bit amusing.
5. Some of us took a trip to Best Buy, Radioshack, Target, and the mall food court. Good times there, though the Dairy Queen didn't serve chicken sandwiches. For a picky eater like myself who eats chicken and/or pizza every freaking day, that's a bummer. I looked at the Popeye's menu there and decided against that purchase. There was no way in heck that I would buy a 6-piece tender meal for almost $9. Instead, I waited until we got back to the hotel to order from Domino's (much better deal).
6. We stayed in the food court for quite some time and talked about a variety of things. Off-hand, I remember math talk, stuff about girls, and Metroid 2002 related things. I really enjoyed talking to Trihex, Carcinogen, and Nate (all of which were present), so this part of the MAGFest trip was probably the high point for me.
7. The auction near the end of MAGFest was a lot of fun as well. The hosts were making some humorous comments about the items being sold, and there were some good deals there. Sadly for me, I only had $3 in cash to spend...and I didn't want to withdraw anything from my checking account. I tried to snag a few things, but ended up settling for the bottle of Bawls.
8. Freddy walked up to me in the game room one day and asked me about selling my Gamecube Hori pad. I like the controller and still use it from time to time (quite often as of right now), so it wasn't for sale. After thinking back on what a cool guy Freddy is, the amount of usage he would get from it, and the price/rarity of such a controller nowadays, I feel kind of bad for not helping him out.
I realize now that I should've let him borrow it for a month or two and then he could have sent it back to me. That should still be an option (I'll ask him about it), but shipping things out of the country might be an issue of some sort. I'll have to ask Mike about that later.
Like I said before, I found MAGFest to be pretty decent overall and I'll consider going to any future (U.S.) meet-up that might happen. If there isn't going to be more of a focus on actual hangout time though, I'm thinking I'll just stay home. If it was at MAGFest again, perhaps I could convince someone to visit me at home? Ha, probably not.
Subscribe to:
Posts (Atom)